O-ring Installation
Encapsulated 'O'-Rings: Groove Installation Guide
FEP/PFA Encapsulated ‘O’-Rings consist of an elastomeric core with a thin FEP or PFA encapsulation.
The encapsulation is a hard material with limited flexibility compared to a fully elastomeric ‘O’-Ring. Encapsulation damage can occur when installing into an internal groove or on to an external groove, where manipulation or stretching of the ring is required.
Care must therefore be taken during installation to prevent encapsulation damage, which would affect sealing capability and performance.
Common Installation Issues
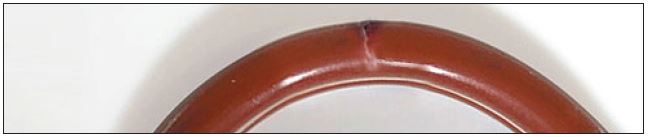
Kinking of the encapsulation
Due to bending, folding, twisting etc.
This creates an uneven sealing surface, preventing an effective compression seal.
Common installation issues can be minimised by ensuring the installation process is carefully considered. The key elements to this are:
- A carefully selected heating method for softening the encapsulation to reduce the stretching/bending force needed during installation.
- Ensuring installation surfaces are free from sharp edges and have a surface finish of 30 micro-inch on a bore and 15 micro-inch on a shaft, to prevent physical damage.
- 'O'-Rings can leak upon initial startup. If this occurs then allow the 'O'-Ring to rest under load for a few hours or preferably overnight. This allows the encapsulation to cold flow and fill any voids. Alternatively a pre-heated 'O'-Ring can be installed and left to cool under load. Due to the 'O'-Ring being softer this allows it to flow into any imperfections quickly.
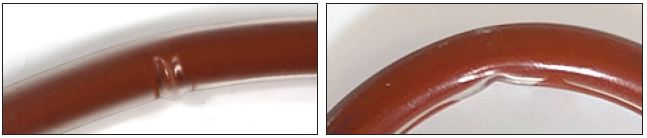
Physical damage to encapsulation
Due to use of a sharp installation tool, uneven stretching of the 'O'-Ring, or installation over sharp edges/burrs.
This results in scratching, thinning or tearing of the encapsulation which will reduce the sealing capability and chemical resistance lifetime.
Heating Methods
Hot Water
- Heat water to 100°C / 212°F (ensure no excessive temperature fluctuation)
- Place rings into heated water for a minimum of 3 minutes (no limit to submersion time)
- Remove ring when required for installation
- Install ring quickly before ring/encapsulation cools and hardens again
- A hot water bath is recommended for use in production environments where fitting demand is constant
Advantages
- Consistent and even heating of entire ring to avoid damage to encapsulation during installation
- Lower purchase and operating costs compared to oven heating
- No limit to submersion time
Oven Heating
- Fit 2 or more shelves into the oven to allow cycling of products
- Lowest shelf to be used for rings ready for installation
- Upper shelves to be used for initial heating of the rings
- When lowest shelf is empty, replace with the shelf above and move to top shelf
-
Set oven to 100°C / 212°F (ensure no excessive temp. fluctuation)
- Use an additional internal thermometer to check against the oven’s digital reading
- Place and spread rings evenly on a heavy gauge baking sheet
- Heat rings for a minimum of 15 minutes (no max. time limit)
- Remove the rings, keeping them on the baking sheet
- If possible and safe, removing individual rings as and when required is ideal (e.g. using heatproof gloves/ tools)
- Install ring quickly before ring/encapsulation cools and hardens again
Advantages
- Consistent and even heating of entire ring to avoid damage to encapsulation during installation
- No time limit to heating duration
Disadvantages
- Multiple rings need to be quickly removed and installed at the same time before the ring/ encapsulation hardens again (unless heatproof gloves/tools are used to remove individual rings)
- Oven temperature can fluctuate excessively when oven door is opened/closed
- Oven purchase and running costs
Direct Heating (Not Recommended)
Use of direct heating methods (e.g. heat lamps and hot plates) are not recommended due to the uneven and inconsistent heating applied.
The heat is typically applied to only one side of the ring, passing through the encapsulation and absorbed by the inner elastomeric core, rather than heating and softening the encapsulation itself.
This leads to the inner core being heated at a much faster rate than the encapsulation, which can increase the propensity for failure at the internal core join during installation.
Groove Installation Method
External Groove
Ensure an even stretch of the 'O'-Ring by use of a tapered fitting tool until it drops into the target groove. Heating of the ring prior to installation is recommended to prevent damage.
Once installed, and if needed, external pressure can be applied evenly across the entire circumference of the ring to ensure it returns to its original diameter. To avoid sealing performance issues and failures, the tool used to apply this pressure should be smooth and not cause damage to the ring's encapsulation.
Ensure the 'O-Ring groove is free from sharp edges and burrs before and after installation.

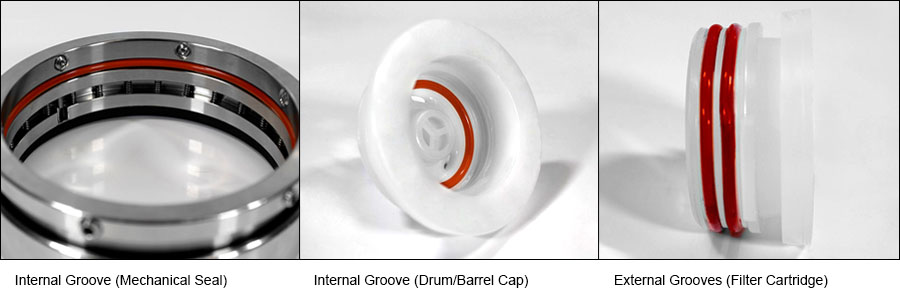
Typical Applications
- Cartridge filters
- Drum/barrel caps and connectors
- Valves
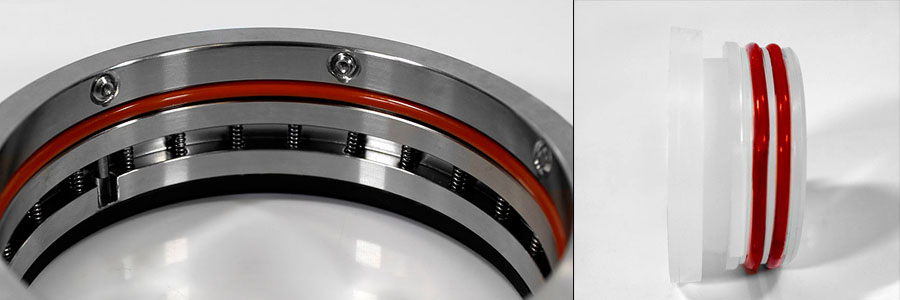
- Mechanical Seals
Internal Groove
An Encapsulated ‘O’-Ring must be temporarily collapsed into an oval for it to be installed into an internal groove. Heating of the ring prior to installation is recommended to prevent damage kinking of the encapsulation.
Once collapsed, push one side of the ring into the opening where the internal groove is situated. Push until the leading edge of the ring fits into the groove. Then, ideally using a suitable pushing tool, push the trailing edge of the ring into the opening until the entire ring is fitted into the groove.
Ensure the ‘O’-Ring groove is free from sharp edges and burrs before and after installation.

Typical Applications
- Mechanical Seals
- Valves
Examples Completed Installations